
Common Service Data Model 4.0 - What has changed?
With the release of Tokyo, ServiceNow published a new version of the CSDM framework. Many of you might wonder what the key differences are to the...
In CSDM (Common Service Data Model) version 4 ServiceNow introduced the so-called “Life Cycle fields” that are to replace all legacy status fields over time. Yep, you read right. At some point you should only be using CMDB-wide fields Life Cycle Stage and Life Cycle Stage Status and eventually, abandon all other status fields still present in CMDB, including e.g. Operational status and Install status. Although Life Cycle fields are not yet a requirement, nor are they supported by all ServiceNow out-of-the-box features, their significance will increase over time, without a doubt.
In this post we’ll explain how to enable CSDM Life Cycle fields. This is the very first step of the longer journey you will need to complete in order to be fully aligned with CSDM, when it comes to CMDM life cycle management. Even better: we’ll cover a special case where the Life Cycle fields are to be used solely inside CIs - leaving Assets out of scope.
Welcome aboard!
What are the CSDM Life Cycle fields? In practice this refers to CMDB (Configuration Management Database) wide reference fields: Life Cycle Stage (life_cycle_stage) and Life Cycle Stage Status (life_cycle_stage_status). And yes, you read right: we are actually dealing with reference fields pointing to tables with the exact names of the fields: life_cycle_stage and life_cycle_stage_status. The fields are a logical pair where the second one (Life Cycle Stage Status) depends on the value of the first one (Life Cycle Stage), meaning that in the latter field, you can only select values that are attached to the value of the first one.
Life Cycle fields were introduced to replace all other “legacy status fields” previously used in CMDB. These contain e.g. Operational status (operational_status), Hardware status (hardware_status), Substatus (hardware_substatus) and Install status (install_status), just to name a few.
It’s important to notice that since the Xanadu version, the Life Cycle mapping has been out-of-the-box based on syncing CI and Asset status fields. For example, if CI’s legacy status value is changed, this value change is first mapped to corresponding Asset’s legacy status fields. This triggers an update to the Asset’s Life Cycle fields that are finally mapped to source CI’s Life Cycle fields. That is, the value mapping is not done “within a CI” by updating CI’s legacy status fields and Life Cycle fields values.
Now, there is a reason for this, but as described in this article, this fairly new setup can be changed so that the out-of-the-box automation automatically syncs CIs’ legacy and Life Cycle fields without using Assets in between. This might even be a requirement for organizations not using Asset Management in the first place. And this is what we’re doing in this article, as we see it as a competent alternative to how the Life Cycle implementation could be done.
To be honest, we’ve found ServiceNow’s instructions on how to implement CSDM Life Cycle fields / Xanadu, if not confusing, at least defective. Like on all topics, there are multiple Community threads available, but they tend not to provide the exact steps needed. And as always, when it comes to CMDB, please keep in mind that it’s always useful to check what David Skowronek has written about the topic. But there still seems to be no step-by-step guide on how to implement Life Cycle fields and populate their values in the CMDB. This is where this blog post comes in.
As a reminder, please note that the target resolution of this blog post is to
As the beef of this blog text is the actual technical implementation, we’re not deep-diving in the pre-implementation here, that would be the analysis / planning phase. In brief, this phase should consist of the following actions:
First things first: the actual activation can/should be done by using Update sets starting from lowest and proceeding finally to the production environment. Time requirement for the actual implementation depends on the number of CIs and CI classes in use.
STEP: Setup Life Cycle Mappings
The most important task of the enablement process is to set up the Life Cycle Mappings. This is done in table Life cycle mapping (life_cycle_mapping), where you must map CI classes’ legacy field values to corresponding Life Cycle value pairs using Life Cycle Control (life_cycle_control) records.
Things to consider:

Screenshot above: Life Cycle Mapping table showing cmdb_ci table’s Operational status <> Life Cycle mappings
STEP: Activate Life Cycle Controls
Activate all Life Cycle Control records used on active mapping records.
Note: This requires ACL changes, as out-of-the-box ACL rules prevent all changes to Life Cycle Control records.
Optional step: Inactivate all Life Cycle Control records not used on active mapping records. Obviously, this is not required at this point, but you will anyways need to do this later on and taking the action now clarifies the playground we’re dealing with.

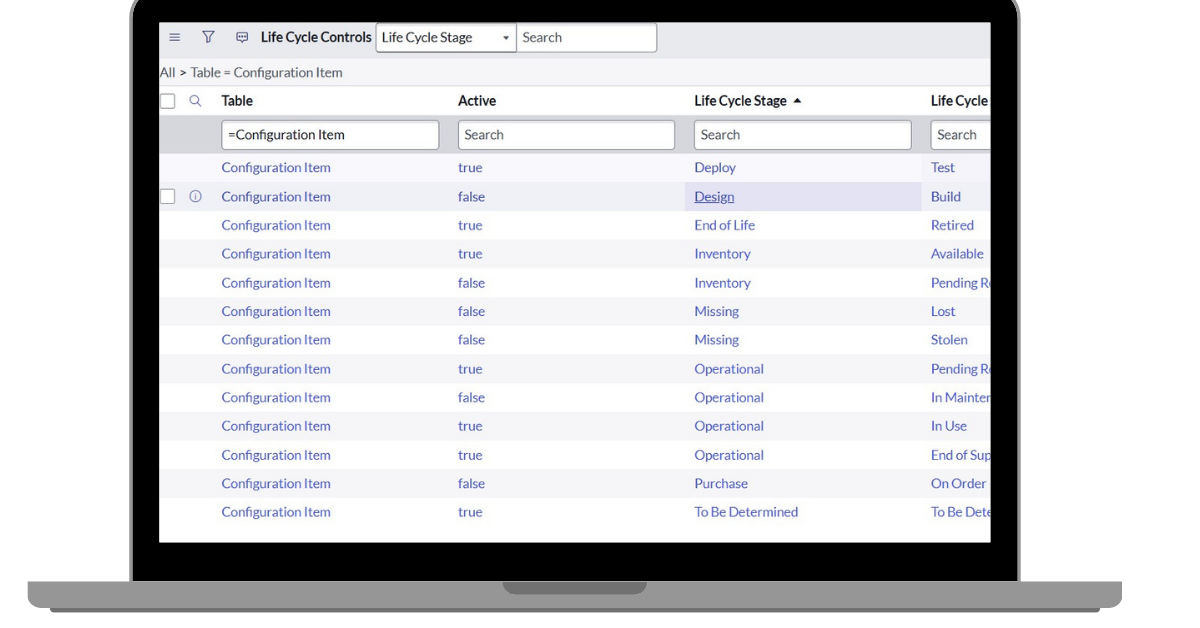
Screenshot above: Life Cycle Control table showing cmdb_ci table’s Life Cycle Stage and Life Cycle Stage Status values
STEP: Set up Asset CI Hardware State Mappings and Asset CI Install Status Mappings
You will most probably need some changes/inserts in two more mapping tables:
Note: It’s safe to press the “Enable Life Cycle Sync” List Action button in the Life Cycle Mapping table’s list view. It won’t start the sync, but instead run a handy Discrepancy Report telling you if you’re ready to go or if some further changes are needed when it comes to status mappings.

Screenshot above: Discrepancy Report shown when the Enable Life Cycle Sync button is used.
STEP: Run initial bulk mapping
Run the initial mapping sync using Default Update set. The estimated run time is displayed before the sync starts. In our experience, you can expect the sync run to handle some 300.000 CIs in five minutes.
Note: Running the initial sync does not trigger Business rules on CIs. Thus, it should be safe to run the sync despite the possible outbound CMDB integrations.
Case specific STEP: Disable Life Cycle sync between CIs and Assets
As you might still remember, in our example case we wanted to implement a straight “inner-CI” sync between CI’s legacy status fields and Life Cycle fields. Thus we change the value of sys_property ‘csdm.lifecycle.sync.between.ci.and.asset.activated’ from ‘true’ to ‘false’.
STEP: Handle CIs with no Life Cycle values
After the initial bulk sync you will most probably end up with CIs with no Life Cycle Stage and Life Cycle Stage Status values. According to SN Support, this is something not to worry about and can be easily fixed as follows:
STEP: Handle CIs with faulty Life Cycle values
Go through all CIs and make sure they’re having the correct Life Cycle Stage and Life Cycle Stage Status values (versus the legacy field value you had mapped the target CI class with). If faulty values are found, they need to be updated.
Note: It’s strongly recommended to do this using scripts that trigger Business rules. For this, please take all your CMDB outbound integrations into account!
STEP: Activate CSDM Activation plugin
Activate plugin: CSDM Activation (com.snc.cmdb.csdm.activation). This plugin is used by some features that actually check if the plugin has been activated.
STEP: Inactivate all not-wanted Life Cycle Mapping and Control records
Especially in our example case, at this point we could inactivate a big amount of Life Cycle Mapping records, leaving only those that map CI legacy status fields to Life Cycle fields as active.
It’s important to understand that Life Cycle Control records actually determine which Life Cycle Stages and Life Cycle Stage Statuses users will be seeing on CI records on CI classes. It’s also worth noting that the Control records are inherited from parent classes to their sub classes.
STEP: Other configuration changes
Some configuration changes may be needed or should at least be considered. One example of these changes would be the Order value of the out-of-the-box Business rule ‘Validate parent’s operational state’ targeted to table Offering (service_offering), that is run as before BR with Order value 100. Without changes, this Business rule prevents the creation of Offering records without setting the Life Cycle field values manually, as the check is done before out-of-the-box automation sets the needed values based on legacy status field values.
And that’s it! Now you should be having Life Cycle values on each and every CI with working, fully automated sync based on CIs’ legacy fields values.
The core Life Cycle tables related to this article:
All System properties (sys_properties) related to this article start with “csdm.lifecycle.”
In this blog article we went through step-by-step instructions on how to start using CSDM Life Cycle fields in CMDB - with a special requirement where the syncing between legacy fields and Life Cycle fields is to be done “inside CI” without circulating the sync via Assets. Introduced in CSDM v4, the Life Cycle fields are growing rapidly in significance, as ServiceNow is utilizing them in more and more features in new family releases.
As always, planning and ground work are the keys to success. You need to know what legacy status fields your instance is using, where they are used, how they are used and what values are actually being used (and for what). Likewise, you need to know what Life Cycle field values you’re going to use on which CI classes (and for what). And you should never underestimate the importance of integrations. Finally, it’s highly recommended to do the shift from legacy fields to Life Cycle fields in phases, where step one would be enabling the feature and populating the values “behind the scenes”. Hopefully this article will help you take this first, initial step.
In case you hesitate about how to proceed with Life Cycle fields, no matter the phase (or CSDM in general), do not hesitate to contact The Cloud People. We’re here to help you - with the required knowledge and experience. CSDM is becoming a more and more crucial part of ITSM and without following it, you will miss out on fantastic out-of-the-box features that require your CMDB to be in the desired state. Let’s make sure together that you make the most of the magnificent ServiceNow platform and what it offers you both now and in the future.

With the release of Tokyo, ServiceNow published a new version of the CSDM framework. Many of you might wonder what the key differences are to the...

Breaking down different service types through a simplified example Business Services, Technical Services, Application Services, Business Service...

Transform maps are powerful tools widely used to process data from import (import set) to ServiceNow tables. After creation, they can be reused, so...