In ServiceNow, a Catalog Item refers to a specific product, service, or requestable item available in the service catalog. Users can select and request these items through the self-service portal. Each Catalog Item has its own details, attributes, and associated workflows for processing and fulfilling user requests. They streamline the request process and improve service delivery within the organization.
Auto-populate a variable based on a reference type variable on the form This allows to define a relationship between Reference type question and other field type like String in Catalog Builder without the need to script. ServiceNow Catalog Builder is a tool within the ServiceNow platform that helps organizations create and manage service catalogs. It has a user-friendly interface for designing and publishing catalogs. Key features include a drag-and-drop editor, dynamic forms, approval workflows, integration with other ServiceNow modules, a self-service portal, and reporting capabilities. It simplifies the process of creating comprehensive service catalogs, improving user experience and service delivery. The value of the dependent question is auto-populated when the value of the initial question is selected or changed. This comes very handy while creating the forms. Of course this feature is not a revolution but yet another step in the no-code direction of the platform. Before Utah, if there was a requirement to get fields like Email auto-populated the developers had to use the GlideForm method which will be explained later.
The end goal should look like this:

Prerequisites
Build name: Utah
Build date: 03-13-2023_1716
Build tag: glide_utah-12-21-2022__patch1-03-01-2023
Guide - Auto Populate feature
In the navigation bar type: sc_cat_item.list - this will open Catalog Items. For the purpose of this example let’s create a new one. At the bottom lets add 2 new variables.
1. Requested for:
Question: Requested for
Name: requested_for
Type: Reference
Order: 100
In Type Specifications tab:
Reference: User [sys_user]
And Submit.
2. Email:
Question: Email
Name: email
Type: Email
Read only: True
Order: 200
With the Utah release there is a new Auto-populate tab. Fill this with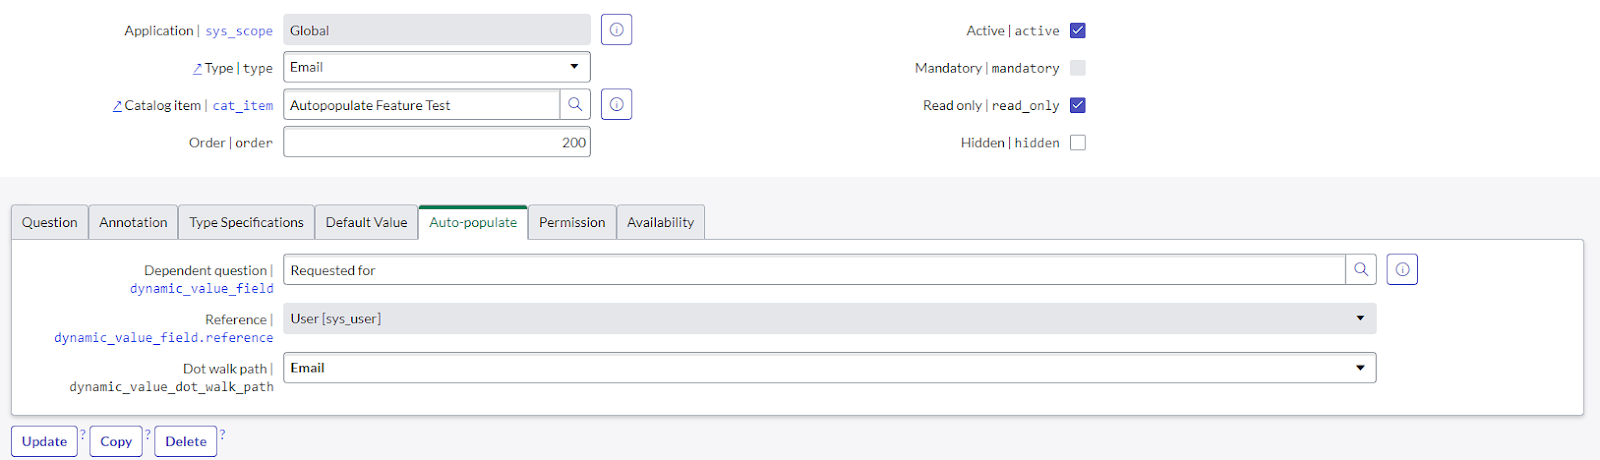
and Submit.
When filling, Requests for the Email will be automatically populated based on the value from Requested for field.
Obviously Auto-Populate feature can do even more. Lets add a 3rd variable called Department.
3. Department:
Question: Department
Name: department
Type: Single Line Text
Read only: True
Order: 300
In Auto-populate tab:
Dependent question: Requested for
Reference: User [sys_user]
Dot walk path: Department and select Name.
This is important to select Name of the Department. Otherwise we would get sys_id not the display value.
Submit. This is how all variables look like in Catalog Item:
To see the final effect press Try It and fill the Requested For field.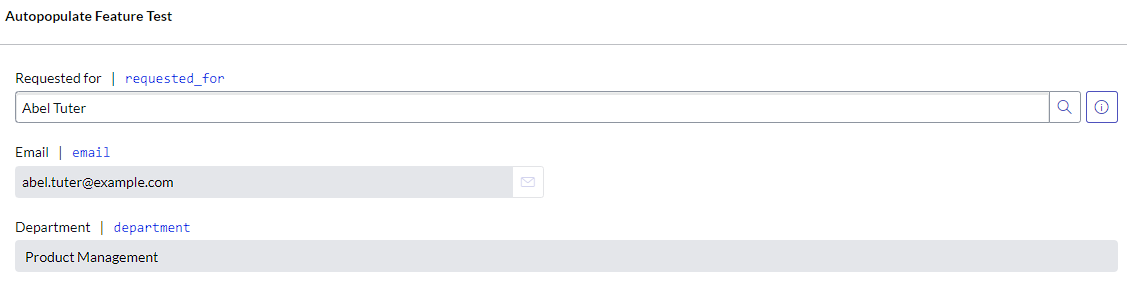
Guide - GlideForm - getReference()
ServiceNow GlideForm is a JavaScript API that provides developers with a wide range of functions and methods to customize and interact with forms in the ServiceNow platform. It allows for dynamic manipulation of form fields, data validation, client-side data retrieval, event handling, form submission control, error handling, and accessibility support. GlideForm empowers developers to create highly interactive and tailored forms within ServiceNow, enhancing the user experience and aligning with specific business requirements.
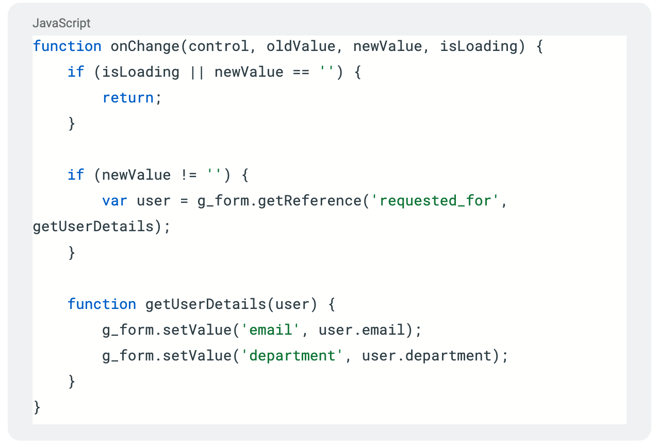
In order to use second method which is g_form.getReference() we have to do some modification to the fields:
1. Clear auto populate reference value for both: Email and Department
2. Set Department type to Reference - otherwise we would get only sys_id of Department, not the name.
3. Create onChange client script with the specifications as below:
Name: getUserDetails
Type: onChange
Variable name: requested_for
Script:
Performance of Auto-populate vs GlideForm.
The performance will be measured by the ServiceNow built-in tool called The Response Time Indicator.
The Response Time Indicator in ServiceNow is a visual representation, typically in the form of a colored icon, that indicates the response time for specific actions or operations. It helps users quickly assess the performance of ServiceNow by displaying colors like green for good response time, yellow for moderate response time, and red for poor response time. The indicator is used to identify potential delays or performance issues during tasks within the platform.
Image of performance test from Auto-populate feature: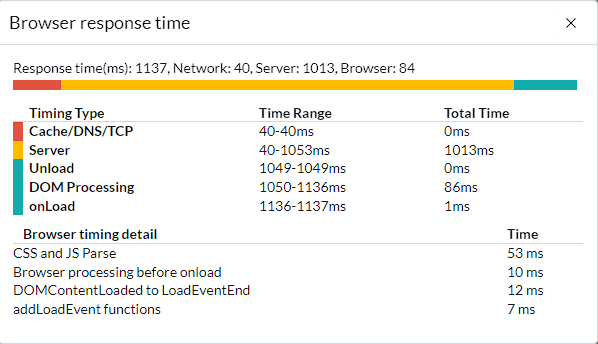
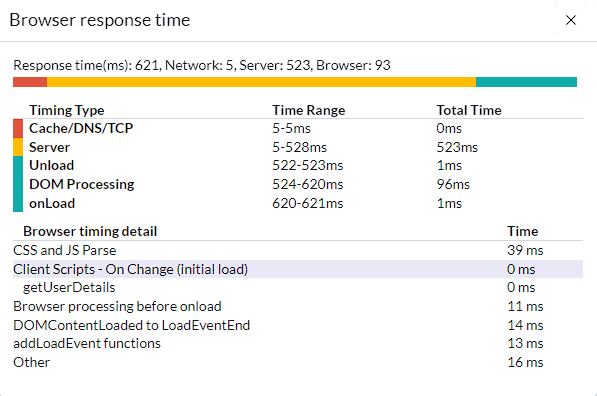
Image from performance test from GlideForm auto-populate:
According to the results GlideForm seems to be less demanding than Utah’s feature. However please remember that this might not be a 100% reliable test.